This page describes a quick route to the installation and use of SHICrivm for new users
We have now provided a standard installation for the EDUCE project which should make the programs easy to use. The package is contained in a zip-file and running requires the following 4 steps:
step 1 unzipping the files and directory
structure: unzip the files and directory structure.
Following installation the following main directory structure
should exist:

step 2 copy the measured spectra and slit function to
the appropriate directories set in shiccall
defaults:
- data in c:\SHICrivm\uvdata\LLL\
(LLL: stands for three lettercode to identify the spectroradiometer (NLR-example is pre-installed)); - DDDhhmm.LLL (example: 0861012.NLR ; two column format: column
1: wavelength (nm) ; column 2: irradiance (W/(m2.nm))
DDD = daynumber of the year
hh = hour of the day
mm = minute of the hour - slit function in main analysis path: c:\SHICrivm\uvanalys\LLL.sli (NLR.sli example is pre-installed)
step 3 Run SHICcall
set the parameters for the specific instrument and
the measurements to be analysed:
- DAYtime field: date and time of the measurements to be analysed
(convention: DDDhhmm: see above)
in figure below all spectra of day 086 are selected - instrument-ID (LLL-code))
- path + DFA-file name (file will be created by SHICcall, in example RIVM2002.dfa (file with parameter settings))
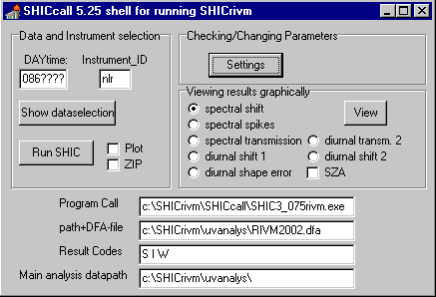

step 4 push the RUN button in the SHICcall main page.
Example of the SHIC3_075rivm.exe
run-window.
- Run starts with version line: SHICrivm version….
- Then gives the analysed filename (DDDhhmm.LLL, inthis case 0861124.nlr)
- information on the estimated transfer in the UVA and UVB and the wavelength shifts in these regions
- End of analysis indicates a successfull end of the run (this run was on a 300 MHz Windows NT-pc).
